Purpose
TopoDOT 64bit and CONNECT are the preferred choice when it comes to overall productivity as well as utilizing the latest tools & features, however many DOTs have not moved over from the legacy platform MicroStation V8i; therefore, you’ll find most (if not all) DOT Workspaces are only available on V8i. All these Design Files (deliverables) must be submitted with the correct levels/linestyles/cells/text/etc. And in-order for these standards to be met you’ll usually need to work with their workspaces on V8i. The idea here is to set-up the TopoDOT-CONNECT environment in such a way that a DGN (including the extracted work) can be referenced later-on into the DOT-V8i-Workspace environment with as little translation work as possible. This will allow the user to extract/work in TopoDOT-CONNECT, save as a DGN and then simply merge into a DOT-V8i-Workspace. And since we are only generating linework, points and cells the translation should go smoothly, while detailed touch up work (creating a surface, updating linestyles, adding text, hatch patterns, etc) will still be performed within the DOT-V8i-Workspace.
What we’ll need from the DOT Workspace directory/folder
- Level Library – Usually in the form of a *.dgnlib file(s).
- Cell Library – Usually in the form of a *.cel file(s).
- Units – Design File Units (or Working Units), Resolution Units
- Can be viewed from the 3D Seed Design File – Usually in the form of a *.dgn file.
Note: You can copy all of these files into a separate folder and work with them outside of the DOT Workspace directory/folder structure. We’ll call this ‘new’ example folder TC1 and it can be local or over the network.
Steps
Note: The following steps will be conducted within the TopoDOT-CONNECT environment. You’ll need TopoDOT 64bit and MicroStation CONNECT (or equivalent CONNECT product: OpenRoads, PowerDraft, etc) installed to continue. Keep in mind that any DGN files created are ‘3D’ and of a ‘V8’ format, DO NOT USE a ‘V7’ format!!
1 – Creating New TopoDOT-CONNECT Seed File
Here we’ll be creating a new seed file (which is a 3D DGN itself) that we can resort to when working in the TopoDOT-CONNECT environment. Let’s call this seed file TC-3D.dgn and when ever we create a future *.dgn we’ll point to this TC-3D.dgn file, which will also be stored in our TC1 folder. As we go through the following steps to add to our seed file, we will also be pulling from our TC1 folder.
- Go to File\New to create a new DGN file.
- You’ll notice a ‘Seed’ file it’s pointing to in which we’ll be using the default Bentley 3D seeds. If you don’t see this then ‘Browse’. These seeds are usually found here C:\Program Files\Bentley\MicroStation CONNECT Edition\MicroStation\Default\Seed and you’ll want to pick an available ‘3D’ DGN (if working in Survey Feet go with Imperial for now and we’ll fine tune it later).
- Name your new DGN file and click ‘Save’
- We’ll be using TC-3D.dgn and it will be saved in our TC1 folder.
- With our new TC-3D.dgn we can now add our levels and cells in the following steps, as well as any personal touches. For more details on setting-up or personalizing your DGN please refer to our ‘Intro to TopoDOT & CONNECT’ video: LINK HERE

2 – Units
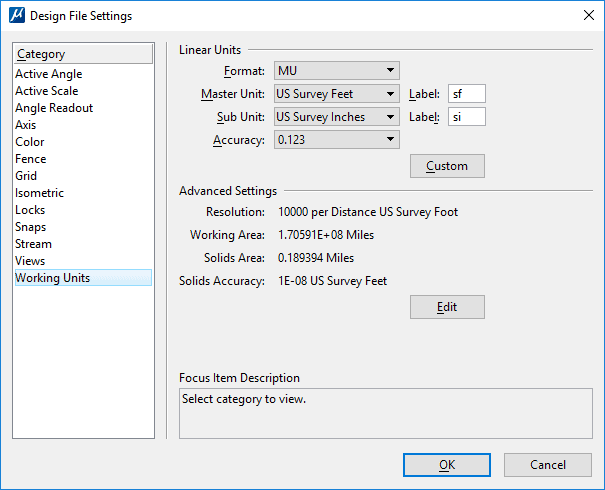
Here is where you’ll want to match your workspace design file units. For example, if you are working in Survey Feet we’ll need to update this for the TC-3D.dgn file.
- Go to the Design File Settings\Working Units
- Update the Master, Sub and Resolution if necessary. Then click ‘OK’
3 – Attaching Levels
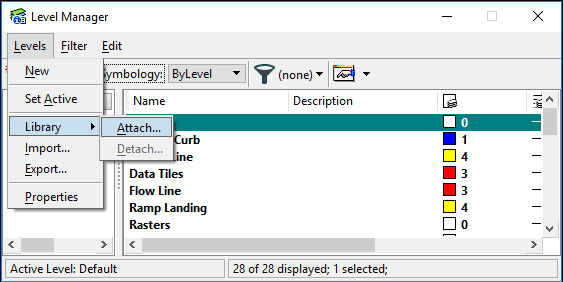
- Go to Level Manager\Levels\Library\Attach
- Here you’ll be prompted to open the corresponding *.dgnlib file(s).
- Note there are other supporting files that can be used. Attach from our TC1 folder.
- Once attached you’ll see the proper levels.
Note: Linestyles won’t carry over but will be corrected when the linework is referenced into the DOT Workspace later. This document does not cover how to sync Linestyles up with the TopoDOT – CONNECT environment.
4 – Attaching Cells
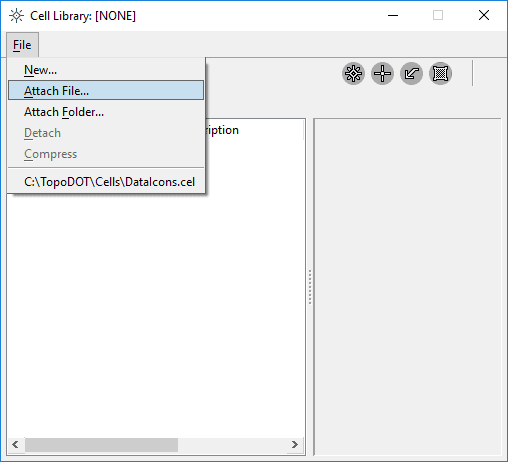
- Go to Cell Library\File\Attach File (or Attach Folder)
- Here you’ll be prompted to open the corresponding *.cel file(s).
- Note there are other supporting files that can be used. Attach from our TC1 folder.
- For multiple *.cel files you’ll want to pick the folder option.
5 – Miscellaneous
- Save & Save Settings before closing!
- If you are setting up multiple machines take a look at how you can copy the TopoDOT and MicroStation settings. See Technote #1040
- There are other files (such as dll’s) associated with the DOT Workspace that can be attached or incorporated but would require a deeper look and is not included within this document.
- An alternative to importing a *.dgnlib for all of the level information would be to utilize TopoDOT’s Symbology Manager which allows imports for GeoPack (XML) or InRoads (XIN) files.
- For this exercise we used a TC1 example folder, however you can pull from the original DOT-Workspace-Folder if working locally and/or planning to keep everything on one machine only.
6 – Creating a new Project file
- Go to File\New to create a new ‘Project’ DGN file.
- You’ll notice a ‘Seed’ file it’s pointing to in which we’ll be using the TC-3D.dgn seed, which was created in the previous steps. If you don’t see this then ‘Browse’ to our TC1 example folder (or where it was stored).
- This new file can be saved within your project’s folder, where the project’s point cloud can be found. Optional
- Name your new ‘Project’ DGN file and click ‘Save’.
- For example, we’ll call this Project1_TopoDOT.dgn
- With our new Project1_TopoDOT.dgn we should see our added levels and cells, as well as any personal touches. This design file is ready for extraction work within the TopoDOT-CONNECT environment.
Conclusion
Now that we have a our seed file set up (similar to the original DOT Workspace) we can now in theory extract/work within the TopoDOT-CONNECT environment and then reference our final Project1_TopoDOT.dgn into the DOT-V8i-Workspace. (Note: To reference a drawing in V8i go to Tools\References\Attach References) When the work is referenced in and then merged into the DOT Workspace all the linework will be updated correctly. Linestyles and Colors will be properly assigned at this point because of the Level names matching exactly. Any final touch up work should be carried out within the DOT-V8i-Workspace environment.
Note/Disclaimer: As simple as this may appear it’s important to always double check the workflow and conduct a small test run before proceeding with these recommendations. This means, create a project file and extract a few features (curbs, road points, paint markings, etc) within the TopoDOT-CONNECT environment and then reference the DGN into the DOT-V8i-Workspace. Also, not all DOT Workspace Directories will be the same so use this document as a general guideline.
0 Comments